All Categories
Featured
Table of Contents
- – Sprinkler Installers Rowland Heights, CA
- – Pacific Green Landscape Maintenance
- – Sprinkler Systems Near Me Rowland Heights, CA
- – Sprinkler Installation Companies Rowland Heigh...
- – Sprinkler Installer Rowland Heights, CA
- – Irrigation System Installers Rowland Heights, CA
- – Irrigation Installer Rowland Heights, CA
- – Commercial Irrigation Repair Rowland Heights...
- – Install Sprinkler System Rowland Heights, CA
- – Irrigation System Installers Rowland Heights...
- – Lawn Sprinkler Repair Rowland Heights, CA
- – Sprinkler Installation Companies Rowland Hei...
- – Irrigation Systems Installers Rowland Height...
- – Installing A Sprinkler System Rowland Height...
- – Pacific Green Landscape Maintenance
Sprinkler Installers Rowland Heights, CA
Pacific Green Landscape Maintenance
6530 Whittier Ave Whittier, CA 90601-3919(562) 203-3567
Pacific Green Landscape Maintenance
It's vital to keep in mind that not all leaks are noticeable. There may be a leakage in the pipe leading to your watering system, causing water to stream even when the sprinklers aren't transformed on. If you're experiencing unexplained spikes in your water costs, it's best to call in an watering system repair service specialist.
If you're seeing patches of dirt erosion around your home, it could suggest your irrigation system isn't working appropriately. When the sprinklers are on, they're supposed to disperse water uniformly throughout your yard.
Sprinkler Systems Near Me Rowland Heights, CA
By addressing the issue at an early stage, you can stop more damages to your home. Staying up to date with routine maintenance needs can expand the life of your lawn sprinkler system considerably. It is very suggested that you work with a solution to winterize your irrigation system every year to protect sprinkler heads and pipelines from freezing and bursting.
They will certainly inspect for any kind of harmed or worn-out parts. It is best to schedule this kind of assessment prior to the springtime or summer begins. This is to guarantee that your lawn sprinkler prepares to go. If you have not had your irrigation system regularly examined, cleaned, or winterized, routine this immediately.
Ask the repair work firm regarding the brand names and suppliers they use for parts. Economical parts will certainly use down fast and cause continuous fixings and replacements. It's a lot far better to install excellent components from relied on distributors like: Specialists get a great deal of specialized training to help a watering service business.
They should finish courses for civil engineering, water circulation, and electric training. Many irrigation service technicians have a partner's level in landscape maintenance. They need to also pass a certification test to work in individual states. Unless you meet these certifications on your own, you could place yourself in risk and possibly damage your system even more by attempting to repair it on your own.
Sprinkler Installation Companies Rowland Heights, CA
Guarantee they are guaranteed and bound to make sure that any type of problems from the company are covered and you aren't entrusted to the costs. Do your research study to see what their online reviews resemble and examine their score on the Bbb. When trying to find a specialist to manage your automatic sprinkler fixing, make sure to inquire concerns to get a feeling for their experience and trustworthiness.
We have been in the watering system business for over 30 years and have both state and nationwide certifications. Dealing with sprinkler system fixing problems or replacements doesn't require to be an irritating experience.
Sprinkler Installer Rowland Heights, CA
At Suburban Grass Lawn Sprinkler Co., our job is to make certain that your lawn sprinkler system is always operating at peak effectiveness. By conducting aggressive sprinkler system maintenance year-round, we are able to take care of potential problems before they end up being a lot more serious, and extend the life of your system while we're at it.
With our team on phone call, repair services have never ever been easier. Expert routine upkeep Quick on-site repair services & fixing Winterization services There are a number of outside entities that can trigger issues with your lawn sprinkler system.
Dennis Gross/ EyeEm/ Getty Images The indicators of a blocked lawn sprinkler head are spots of brown yard around the sprinkler head or a lawn sprinkler head that will certainly not increase or partially increase. Dust and great sand will certainly clog the filter in the pop-up section of the lawn sprinkler head.
Irrigation System Installers Rowland Heights, CA
Cleaning or replacing the filter in the sprinkler head will bring back the consistent spray pattern and allow the sprinkler heads to climb. Lift the sprinkler pop-up area by hand to its greatest position.
Use needle-nose pliers if required. To clean the filter, use a toothbrush, soapy water, and tidy water to rinse. Turn on the lawn sprinkler system before replacing the filter to flush out the system.
Irrigation Installer Rowland Heights, CA
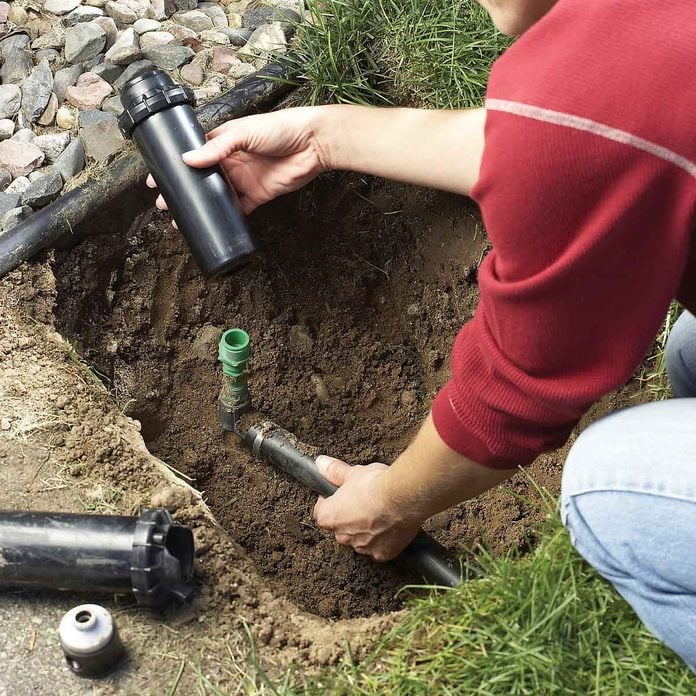
MarcoMarchi/ Getty Images Signs that it is time to replace a lawn sprinkler head are when turf around the lawn sprinkler is discolored or patchy, the lawn sprinkler head does not rise or only partly climbs, or when the lawn sprinkler head has actually come to be damaged. A lawn sprinkler head has a large plastic round base that connects to the water line and a top telescoping cylinder that increases to spray water.
Utilize a garden spade to remove a broad circle the sprinkler head. Cut the turf meticulously to stay clear of cutting buried sprinkler lines. Unscrew the lawn sprinkler head by hand till it launches. Carefully raise the sprinkler head out of the hole. Place the new lawn sprinkler head into the hole and onto the male string at the base.
Lawn sprinkler risers been available in sizes from 1/2 inch to 24 inches. Cut-off risers are a good choice when you're not exactly sure of the riser's specific size. Cut-off risers have six to 8 sectors that can be quickly broken off to adjust the size of the riser. A 1/2-inch by 12-inch cut-off riser is a versatile length and costs $1 to $2 each.
Commercial Irrigation Repair Rowland Heights, CA
Get to into the opening left by the sprinkler head and grasp the riser. Action the new lawn sprinkler riser versus the old riser and cut it to dimension with a PVC pipe-cutting device.
Clean the sprinkler head and filter or change the filter if the low tide pressure is local at simply one or 2 lawn sprinklers. Or change the whole sprinkler head if cleaning the old lawn sprinkler's filter does not enhance the water stress. Run the sprinklers during non-peak water make use of hours. Peak hours are generally from 9:00 am to 5:00 pm, though every area is different.
The isolation valve is in the covered shutoff box. A knife valve take care of need to be alongside the pipeline and a round deal with shutoff needs to be transformed totally leftward. Open up your home's major water shut-off valve completely. Water for sprinklers originates from the curb-side water meter, goes into the residence via the water shut-off shutoff, and is once more sent exterior to the sprinklers.
Install Sprinkler System Rowland Heights, CA
Switch off the water to the lawn sprinkler. Include the cut marks to the PVC lawn sprinkler line. One mark must get on the within side of the slip combining and the various other mark need to go to the end of the telescope base. Cut the sprinkler line dead-on with the PVC cutter.
Collapse the fixing combining to its shortest size. Include PVC solvent throughout of the cut pipeline and to the inside ends of the coupling. Functioning rapidly, place the coupling in between the cut pipeline and prolong the combining. Make certain to hold the combining expanded for about a min for the solvent to totally cure.
You will certainly need a multimeter, flashlight, and 0.75 amp substitute fuses. If none of the lawn sprinkler zones will certainly run, inspect the power resource that feeds that lawn sprinkler system's transformer.
If some zone are working and others are not, utilize the multimeter to examine for the proper voltage to the non-working stations. A lot of domestic lawn sprinkler are 24V systems which ought to result a signal in the 24V to 28V range. If the controller is sending the appropriate existing to the non-working stations, inspect the connection of the circuit to identify any kind of circuitry troubles.
Irrigation System Installers Rowland Heights, CA
Eliminate the fuse and change it with a fresh fuse. The Spruce/ Kevin Norris One indication of a faulty lawn sprinkler solenoid is when a specific sprinkler shutoff will certainly not switch on also if the remainder of the electrical system is working appropriately. You'll know if an individual lawn sprinkler solenoid is defective if 3 conditions are existing: it has worked in the past, various other valves are functioning, and the primary controller is working.
A sprinkler solenoid expenses from $15 to $35. Some sprinkler systems might approve universal solenoids, yet it's constantly safest to purchase a solenoid for your sprinkler brand and model. Switch off the water to the lawn sprinkler. Find the lawn sprinkler solenoid in the protected valve box. Find the cables that connect the major controller to the solenoid.
Screw the wire nut off of the bundle and untwist the wires. Eliminate the old solenoid by turning it counterclockwise. Set up the new solenoid by turning it clockwise by hand. Connect the solenoid's white cable to the system's white cable with a cable nut. Link the various other solenoid wire to the system's power wire, which may be red or black.
It can be hard to locate the source of leaks, too. FAQ Rebuilding a sprinkler valve or completely changing it can set you back from $12.50 to $150 per shutoff. Typically, it will certainly cost around $81 to reconstruct a lawn sprinkler valve. You will certainly know if a below ground lawn sprinkler is leaking with visible signs at ground degree: spongey or wet spots of turf, excess lawn growth, sloppy ground; or damp concrete.
Lawn Sprinkler Repair Rowland Heights, CA
The store will not function properly when cookies are handicapped. 2025 Rain Bird Corporation. All Civil liberties Scheduled.
Whether your present system is in need of upgrading, repairs or a little TLC, we can educate you of the numerous new and exciting developments that have taken place in the below ground sprinkler industry, which will include in its long life. We will examine your existing system, offer your focus if any type of repair work are required or any type of adjustments that can be made to offer you with an efficient irrigation system.
Listed here is a recap of services that we use:.
Sprinkler Installation Companies Rowland Heights, CA
For yards in drier environments, an in-ground lawn sprinkler is a requirement to accomplish a green yard. The majority of lawns that get less than 1 inch of rain during a week need to have some kind of irrigation system to make certain that the lawn is watered enough. Lawn sprinkler systems are complete of lots of relocating parts, and it's only natural that sprinkler heads require changing and underground pipelines need repair service at some factor.
You additionally won't need to fret about drainages and damp places that come from too much water. By maintaining your watering system, you will certainly ensure that your lawn is sprinkled precisely as long as it needs to be, which will certainly aid maintain your lawn healthier and greener. You will aid save water.
Caring for your lawn sprinkler assists make certain that just the right quantity of water is being utilized, which it's being used for your lawnnot the automobiles, house, or driveways. Ensure you do lawn sprinkler maintenance a minimum of yearly. At the beginning of the sprinkler season, you need to always carry out a routine examine your automatic sprinkler.
Irrigation Systems Installers Rowland Heights, CA
It can be tough to find the resource of leakages, also. Frequently asked question Rebuilding a lawn sprinkler shutoff or completely changing it can cost from $12.50 to $150 per shutoff. Usually, it will set you back around $81 to rebuild a lawn sprinkler shutoff. You will understand if a below ground sprinkler system is leaking with visible indications at ground level: spongey or wet spots of grass, excess yard growth, muddy ground; or damp concrete.
The store will not function properly when cookies are disabled. 2025 Rain Bird Company. All Civil liberties Booked.
Whether your current system requires upgrading, repair work or a little TLC, we can inform you of the several brand-new and exciting innovations that have actually taken place in the below ground lawn sprinkler market, which will certainly contribute to its longevity. We will examine your current system, bring to your attention if any repair work are needed or any type of modifications that can be made to supply you with a reliable irrigation system.
Installing A Sprinkler System Rowland Heights, CA
Listed here is a summary of solutions that we supply:.
For backyards in drier environments, an in-ground automatic sprinkler is a necessity to accomplish an environment-friendly lawn. Most grass that receive much less than 1 inch of rain during a week must have some kind of irrigation system to ensure that the lawn is sprinkled enough. Lawn sprinkler systems are full of many moving components, and it's just all-natural that lawn sprinkler heads require changing and below ground pipelines require repair at some factor.
You likewise won't require to stress over drainages and wet areas that originate from way too much water. By preserving your irrigation system, you will certainly make certain that your yard is watered specifically as much as it requires to be, which will aid keep your grass healthier and greener. You will certainly help preserve water.
Pacific Green Landscape Maintenance
Address: 6530 Whittier Ave Whittier, CA 90601-3919Phone: (562) 203-3567
Email: [email protected]
Pacific Green Landscape Maintenance
Caring for your lawn sprinkler helps make sure that only the correct amount of water is being made use of, and that it's being used for your lawnnot the cars, home, or driveways. Rowland Heights Sprinkler Installation Companies. See to it you carry out lawn sprinkler upkeep at the very least annually. At the start of the lawn sprinkler season, you need to always do a regular check on your lawn sprinkler system
Lawn Irrigation System Rowland Heights, CAIrrigation Systems Installers Rowland Heights, CA
Lawn Sprinkler Installers Rowland Heights, CA
Irrigation Maintenance Rowland Heights, CA
Lawn Irrigation Services Rowland Heights, CA
Sprinkler Systems Near Me Rowland Heights, CA
Lawn Sprinkler Repair Rowland Heights, CA
Residential Irrigation Repair Rowland Heights, CA
Sprinkler System Installer Rowland Heights, CA
Sprinkler System Installer Rowland Heights, CA
Sprinkler System Repairs Rowland Heights, CA
Sprinkler Systems Near Me Rowland Heights, CA
Irrigation System Repair Service Rowland Heights, CA
Sprinkler Installers Rowland Heights, CA
Sprinkler Installation Companies Rowland Heights, CA
Lawn Sprinkler Companies Rowland Heights, CA
Sprinkler System Installer Rowland Heights, CA
Lawn Sprinkler Companies Rowland Heights, CA
Lawn Irrigation Companies Rowland Heights, CA
Irrigation Installers Rowland Heights, CA
Irrigation Service Rowland Heights, CA
Lawn Sprinkler Installers Rowland Heights, CA
Lawn Sprinkler Service Rowland Heights, CA
Sprinkler System Installation Rowland Heights, CA
Lawn Sprinkler Service Rowland Heights, CA
Lawn Irrigation Services Rowland Heights, CA
Sprinkler System Repairs Rowland Heights, CA
Lawn Irrigation System Rowland Heights, CA
Landscape Irrigation Repair Rowland Heights, CA
Irrigation System Installers Rowland Heights, CA
Sprinkler Installer Rowland Heights, CA
Irrigation Repair Services Rowland Heights, CA
Sprinkler Systems Installers Rowland Heights, CA
Sprinkler System Repairs Rowland Heights, CA
Irrigation System Maintenance Rowland Heights, CA
Irrigation Repair Services Rowland Heights, CA
Commercial Irrigation Services Rowland Heights, CA
Lawn Irrigation Companies Rowland Heights, CA
Sprinkler Installation Companies Rowland Heights, CA
Sprinkler Systems Installers Rowland Heights, CA
Installing A Sprinkler System Rowland Heights, CA
Irrigation Repair Services Rowland Heights, CA
Commercial Irrigation Repair Rowland Heights, CA
Lawn Irrigation System Rowland Heights, CA
Irrigation Installer Rowland Heights, CA
Irrigation System Repair Service Rowland Heights, CA
Irrigation Maintenance Rowland Heights, CA
Irrigation Repair Services Rowland Heights, CA
Sprinkler System Installer Rowland Heights, CA
Residential Irrigation Repair Rowland Heights, CA
Lawn Irrigation Companies Rowland Heights, CA
Irrigation Service Rowland Heights, CA
Install Sprinkler System Rowland Heights, CA
Lawn Irrigation Companies Rowland Heights, CA
Installing A Sprinkler System Rowland Heights, CA
Installing A Sprinkler System Rowland Heights, CA
Irrigation Installers Rowland Heights, CA
Residential Irrigation Repair Rowland Heights, CA
Lawn Sprinkler Installers Rowland Heights, CA
Lawn Sprinkler Companies Rowland Heights, CA
Sprinkler Installers Rowland Heights, CA
Lawn Sprinkler Repair Rowland Heights, CA
Lawn Irrigation Services Rowland Heights, CA
Around Here Seo Pricing Rowland Heights, CA
Near Here Seo Marketing Agency Rowland Heights, CA
Pacific Green Landscape Maintenance
Table of Contents
- – Sprinkler Installers Rowland Heights, CA
- – Pacific Green Landscape Maintenance
- – Sprinkler Systems Near Me Rowland Heights, CA
- – Sprinkler Installation Companies Rowland Heigh...
- – Sprinkler Installer Rowland Heights, CA
- – Irrigation System Installers Rowland Heights, CA
- – Irrigation Installer Rowland Heights, CA
- – Commercial Irrigation Repair Rowland Heights...
- – Install Sprinkler System Rowland Heights, CA
- – Irrigation System Installers Rowland Heights...
- – Lawn Sprinkler Repair Rowland Heights, CA
- – Sprinkler Installation Companies Rowland Hei...
- – Irrigation Systems Installers Rowland Height...
- – Installing A Sprinkler System Rowland Height...
- – Pacific Green Landscape Maintenance
Latest Posts
Youtube Marketing Anaheim
Diamond Bar Video Marketing Online
Marketing Video Production Services Orange
More
Latest Posts
Youtube Marketing Anaheim
Diamond Bar Video Marketing Online
Marketing Video Production Services Orange