All Categories
Featured
Table of Contents
- – OCRV Center
- – Understanding Your RV Roof Repair Options Near Me
- – Breaking Down Sealants and Coatings for RV Roofs
- – When Full RV Roof Replacement Makes Sense
- – Direct Cost Comparison: Sealants vs Full Repla...
- – Pros, Cons, and Decision Framework
- – Preventing Future RV Roof Problems
- – Real Owner Experiences and Outcomes
- – Why Choose a One-Stop Shop for RV Roof Repair ...
- – We Can Help! Contact Us Today
- – Frequently Asked Questions About RV Roof Repai...
- – OCRV Center
RV roof repair near me becomes a priority the instant owners notice first indicators such as ceiling discoloration, dripping during storms, or spongy roof sections hinting at water intrusion. Sealants and coatings serve as an accessible affordable repair approach by depositing protective barriers over the existing membrane to close vulnerable seams, strengthen weak points, and extend roof lifespan without complete stripping. Full replacement, by contrast, strips away the old covering, inspects and fixes the substrate, and places a new membrane to reestablish full structural strength from the ground up. Both approaches reliably fix leaky RV roof problems, yet the ideal path hinges on the real degree of deterioration, the particular roof type involved (such as EPDM, TPO, or fiberglass), available budget, and long-term performance goals. This in-depth analysis compares sealants and full replacement directly—including cost breakdowns, process steps, benefits and drawbacks, long-term outcomes, and effective prevention strategies—allowing RV owners make informed decisions and sidestep costly secondary damage that arise from delayed roof care.
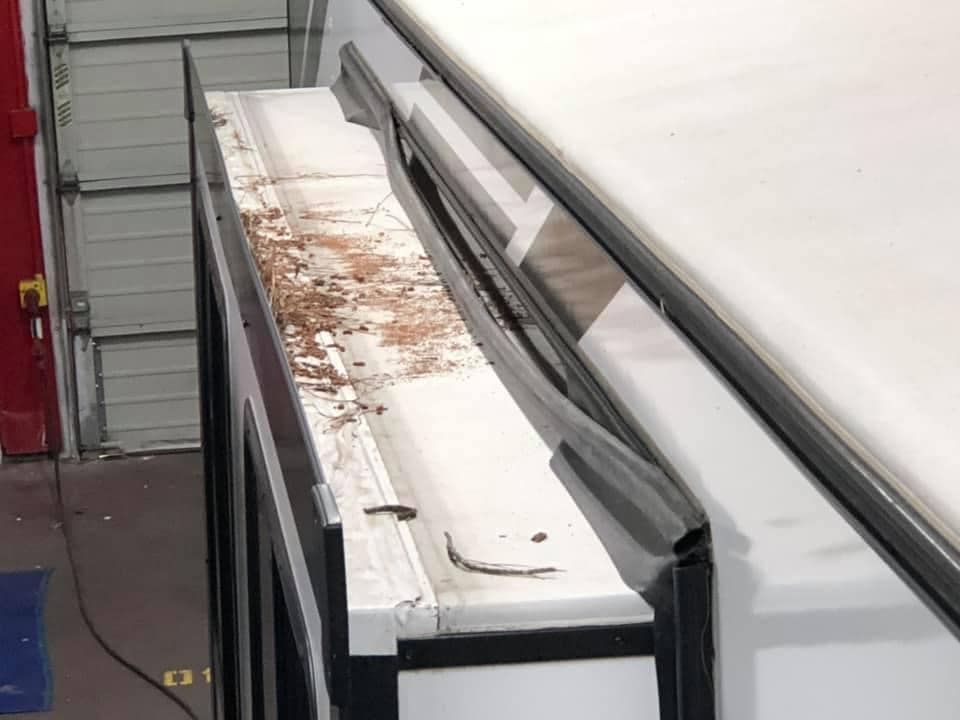
Roof leaks is one of the most common and costliest risks RV owners face, often progressing from minor access points into broad internal harm, mold outbreaks, electrical issues, and damaged framework if left unaddressed (Santa Ana Rv Rubber Roof Replacement Cost). Qualified roof service stops this escalation promptly, safeguards the vehicle's overall condition, and supports stronger resale prices. Owners who tackle roof concerns proactively feel much less stress and substantially reduced surprise breakdowns compared to those who postpone action until visible rot or major structural compromise forces emergency intervention. Service data regularly indicates that regular roof care lowers substantial leak-related expenses dramatically over the vehicle's lifespan

Understanding Your RV Roof Repair Options Near Me
Owners typically launch RV roof repair near me inquiries when early warning signs appear after rainfall or storms or casual walk-around inspections. Inside leaks show up as persistent dark water stains, blistering surfaces, or altered ceiling sections, frequently located near roof fixtures like vents and AC. Compressible zones noticed under pressure on flooring or when pressing the roof exterior reveal moisture penetration the plywood decking and starting to degrade support. Failed, brittle, or missing caulking along edges, corners, and all roof penetrations lets water penetrate, particularly after repeated heating and cooling cycles. Such indicators usually spread—water migrates horizontally and vertically, fostering mold colonies, soaking insulation materials, causing wire corrosion, and weakening structural elements if left unattended.
Prompt response to these initial signals protects both immediate usability and future resale worth. Postponed response frequently leads to secondary repairs—cabinetry and upholstery work, electrical rewiring, mold remediation—that frequently outstrip the cost of initial roof work by several times. Regular visual checks and prompt expert evaluation transform potential crises into manageable service items. Those who act on first indications feel considerably reduced worry, reduced vehicle out-of-service time, and increased peace of mind on the road. Industry maintenance records demonstrate consistent roof maintenance cuts substantial water-related claims substantially compared to reactive approaches.
Identifying warning signs promptly gives control—reach out to professionals for a complimentary inspection to catch issues before they escalate. To learn more about roof solutions, explore our detailed RV roof repair guide.
Breaking Down Sealants and Coatings for RV Roofs
Sealants and coatings function as the first-line method for most RV roof repair near me situations where deterioration remains confined to the outer membrane, failed caulking, or small punctures without substrate damage. These coating systems integrate completely to the existing surface, forming a seamless waterproof barrier that seals critical penetrations and providing strong protection against sun damage, temperature fluctuations, and minor physical damage. Silicone RV roof coating performs exceptionally for its outstanding flexibility and crack resistance across extreme temperature variations, rendering it particularly suitable in regions with intense sun exposure or frequent weather shifts. Acrylic-based coatings offer strong bonding on different roof materials and easier future applications during later service visits. Reinforced hybrid formulations intersperse polyester fabric layers between coating applications, greatly enhancing puncture resistance—perfect for roofs exposed to overhanging branches, hail exposure, or debris accumulation during parking or transit.
Professional application adheres to a methodical process designed to maximize adhesion and longevity. Beginning thorough washing along with hand scrubbing removes oxidation layers, debris and residue, previous sealant residue, and all loose debris that could interfere with bonding. Professionals next repair obvious cracks and seam issues, apply appropriate primers where required, and carefully apply several uniform layers to guarantee complete coverage, with particular attention paid to edges, corners, and fixtures including vents, skylights, antennas, and AC units. Setting time vary from hours to days according to weather conditions and product requirements, followed by comprehensive flood or pressure checks ensures no leaks remain. Typical pro jobs finish in one or two days, permitting quick return to use with reduced downtime.
Expected lifespan usually covers five to ten years under typical operating conditions, although intense sunlight, extreme temperature swings, heavy road vibration, or prolonged exposure to harsh environments can shorten that interval. Scheduled annual inspections detect wear patterns promptly, plus minor reapplications during upkeep extend peak performance significantly. Costs typically fall from eight hundred to three thousand five hundred dollars, influenced by surface area, cleaning demands, product grade, and extra strengthening. Expertly installed coatings have demonstrated substantial reduction leak incidents compared to untreated or inadequately maintained roofs, per RV repair industry data.
Coatings provide reliable, tested defense for many roofs—reach out for a no-obligation quote tailored to your RV’s needs. Learn more about related maintenance in our RV maintenance page.
When Full RV Roof Replacement Makes Sense
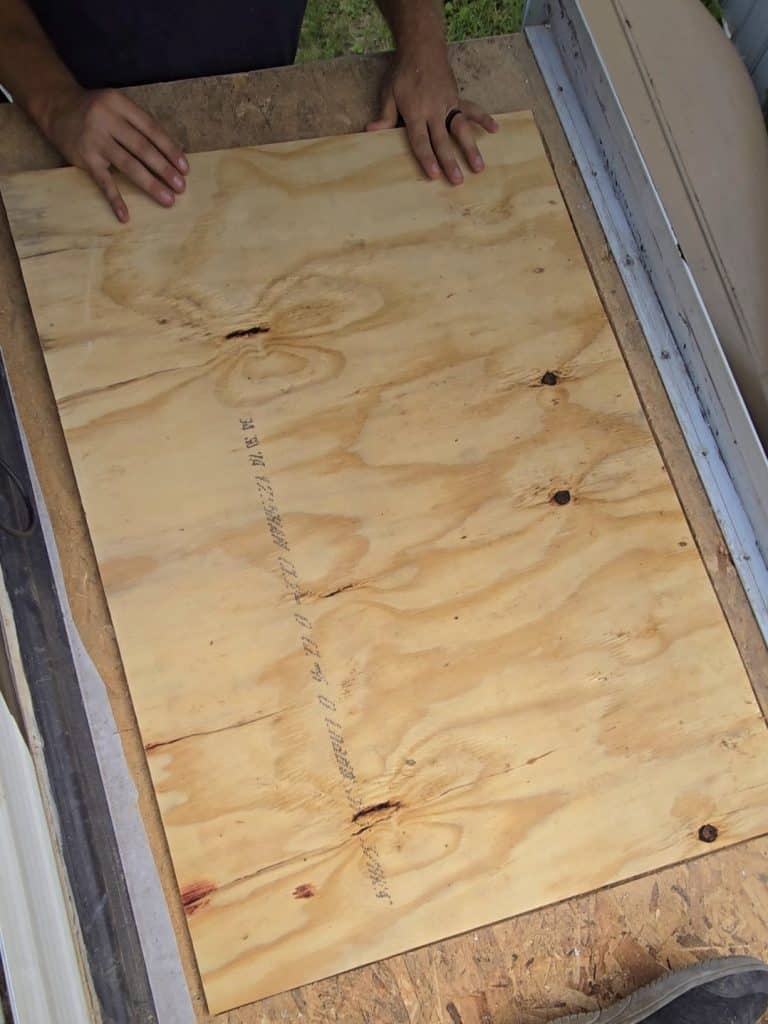
Complete roof replacement becomes required when detailed inspection reveals damage penetrating past the outer layer. Widespread dry rot within plywood decking, major delamination between layers, or recurring sealant breakdowns demonstrate that surface-level treatments will provide only temporary containment while core decay advances. Keeping damaged substrate in such cases risks persistent moisture entrapment, speeding mold growth, insulation degradation, and eventual safety issues from degraded framing during highway travel.
Contemporary replacement projects employ cutting-edge products tailored to RV requirements. TPO offers excellent heat deflection, withstanding chemical contact, and maintaining low weight helping fuel efficiency on long hauls. PVC allows seamless heat welding that create superior waterproof integrity and strong defense against punctures and wear. Fiberglass roofs require meticulous contour matching to keep original shape and structural properties. The entire workflow starts with controlled stripping of the current roof layer, complete deck evaluation, targeted repair or full replacement of damaged plywood sections, potential insulation improvement, and accurate new membrane application accompanied by reinforced sealing at every penetration point—vents, skylights, antennas, solar arrays, air conditioners, and edge terminations.
Results surpass simple leak fixing—the process completely renews structural strength, eliminates concealed moisture reservoirs, and offers long-term low-maintenance durability under standard operating conditions. Better insulation performance commonly appears from improved insulation integration during reconstruction. Certified new roof work typically elevate buyer confidence and buyer interest. Most owners note the post-work sensation as returning to a refreshed, worry-free vehicle prepared for ongoing travel free from roof worries.
Total renewal rebuilds core strength as necessary—arrange a professional evaluation to confirm the right path forward. See examples of similar work in our photo gallery.
Direct Cost Comparison: Sealants vs Full Replacement
Cost considerations rank among the top factors of decision-making for RV roof repair near me questions. Sealants and protective coatings generally fall within $800–$3,500 on typical RVs. This figure incorporates comprehensive surface preparation, top-tier materials, expert labor, and final verification testing. Reduced pricing fits when size is small or prep is minimal, higher figures account for larger surface areas, heavy oxidation cleaning, crack fixing, or specialized reinforcement needs.
Total roof renewal work usually span $4,000–$12,000. The figure includes vehicle size, selected material, deck repair needs, work for removal and installation, and any custom sealing requirements. Site access challenges, including difficult locations or height issues, can adjust the final amount. Service industry records repeatedly indicate that ignored roof leaks frequently trigger secondary interior, electrical, and structural repairs averaging five thousand to fifteen thousand dollars or higher, highlighting the financial prudence of dealing with roof problems before escalation.
Extended value analysis clearly supports selecting the approach that accurately aligns with confirmed damage severity. Coatings provide instant cost savings and reliable continued defense when applied to intact substrates. Replacement, despite the larger initial investment, eliminates repetitive repair cycles and shields against catastrophic secondary damage that might exceed the initial cost many times. Clear, detailed estimates from seasoned professionals ensure clarity and set realistic budgets with long-lasting results.
Extensive practical expertise and professional certifications enable precise planning and delivery—delivering logical cost control and peace of mind from clarity. Review our method with other options on our RV roof repair page.
Pros, Cons, and Decision Framework
Evaluating RV roof coating vs replacement pros cons shows specific strengths for each method. Sealant applications finish fast—often in one day—require substantially lower initial outlay, and deliver immediate waterproof protection while simultaneously improving resistance to sun damage and environmental weathering. They perform reliably for ongoing maintenance plans or when base structure stays solid. The main limitation emerges when hidden rot, delamination over large areas, or repeated prior sealant failures are present; sealants in such cases can hide rather than eliminate the root cause, possibly leading to repeat issues and escalating total costs.
Replacement provides a thorough, long-lasting resolution by directly confronting root causes at the substrate level. It eradicates concealed moisture accumulation, fully rebuilds structural integrity, and provides longest durability with reduced long-term care. Primary drawbacks involve higher upfront cost and extended project duration, although offset by dramatically reduced lifetime maintenance demands, better complete vehicle performance, and improved resale appeal.
A reliable selection method commences with professional inspection—carefully testing for weak sections, detailed inspection of seams and fixtures, and fully documenting results. Integrate those findings with specific usage profile (daily use vs weekend getaways), local environmental factors, and financial constraints to determine the optimal choice. This structured approach eliminates emotion-driven choices and leads to the method that provides maximum safeguarding, value retention, and peace of mind.
This process clears confusion—obtain expert input with a complimentary consultation. Check our detailed RV service offerings for related needs.
Preventing Future RV Roof Problems
Regular use of RV roof maintenance tips and preventive measures to prevent RV roof leaks permanently focuses on regular monitoring over crisis response. Suggested check schedules include at least twice annually plus additional checks, allowing detection of emerging deterioration before advancement. Thorough cleaning eliminates debris from channels and seams, while detailed examination of sealant condition at all fixtures and edges reveals areas requiring immediate attention before failure occurs. Gentle pressure testing over the whole area reveals compressible areas that suggest initial deck issues warranting closer professional evaluation.
Regular oversights which speed up roof wear skipping planned sealant maintenance, selecting wrong or cheap caulk that fails early, or disregarding small cracks that widen during seasonal temperature fluctuations. Collected debris creates persistent water-trapping conditions. Unnecessary foot traffic causes gradual micro-tears. Strategic parking under protective cover during severe weather limits risk to falling branches and sap buildup. Expert preventive applications used in regular upkeep provide extra strong protection against ultraviolet degradation and outdoor elements.
Preventive practices extend roof life significantly—expert guidance ensures nothing is overlooked. Discover maintenance strategies on our RV maintenance section.
Real Owner Experiences and Outcomes
Owners addressing RV roof repair near me frequently recount remarkably parallel experiences. One motorhome owner from Anaheim detected progressive ceiling discoloration following heavy wet weather and selected professional coating application. The treatment sealed every entry point effectively and prevented continued intrusion, preventing mold development and allowing seamless trip planning. “The straightforward work removed our constant worry about interior water damage,” the owner commented in follow-up feedback.
A trailer owner in Irvine encountered severe delamination and rot on their fifth wheel. Full replacement resolved chronic leaks completely and revived interior to original quality. “It gave instant worry-free feeling—no more anxiety during rainstorms,” the owner stated. A third case from Huntington Beach involved a travel trailer with repeated seam failures. Focused reinforcement extended usability greatly without requiring full removal. “We recovered trust in the vehicle for long-distance trips,” the owner commented. These stories illustrate the substantial relief and reliable results that come from expert, systematic roof work.
These actual outcomes reflect the peace of stress-free use and the practical certainty of reliable, expert craftsmanship. See similar transformations in our testimonials.
Why Choose a One-Stop Shop for RV Roof Repair Near Me
Choosing a one-stop facility dramatically simplifies RV roof repair near me by coordinating all related repairs within a single coordinated effort. Leaks frequently influence wiring, insulation, cabinets, floors, fabrics, and inside components—resolving every related element in one go removes coordination issues, duplicated effort, and the chance of partial or inconsistent repairs. This unified approach substantially reduces total vehicle downtime and decreases the risk of overlooked secondary consequences that could generate additional expenses in the future.
Our reach includes throughout Southern California, including all major cities and areas like Anaheim through Yorba Linda, plus regions spanning Los Angeles County to San Diego County—readily available near major freeways including the 5 and 91.
The unified service model eliminates fragmented fixes and delivers cohesive, high-quality outcomes—contact experts at 23281 La Palma Ave. Yorba Linda CA 92887, (714) 909-1444 for support. Discover more about our full capabilities on the main website.
We Can Help! Contact Us Today
Qualified RV roof repair near me always surpasses short-term solutions or self-performed repairs across most situations. Santa Ana Rv Rubber Roof Replacement Cost. DIY efforts often miss hidden decay, utilize incompatible materials, or fail to achieve proper adhesion and uniform coverage, resulting in repeated failures and progressively higher cumulative expenses. Certified technicians apply recommended products, careful application techniques, and comprehensive testing procedures that produce verifiable, long-lasting waterproof performance
The psychological benefits are significant: relief from persistent concern about water damage ruining trips, causing health issues inside, or requiring unexpected downtime. In terms of value, certified roof service delivers excellent financial return by avoiding thousands in inside repairs, prolonging RV usability, preserving higher resale prices, and providing dependable protection through diverse seasonal and travel conditions.
Choosing expert RV roof repair near me means reclaiming peace of mind, safeguarding your investment, and assuredly preparing for adventures. Our professionals focus on RV roof repair near me plus related work, ensuring swift, trustworthy performance. From motorhomes and fifth wheels to travel trailers and camper vans, we serve every RV category with skill and dedication. Easily accessible near the 5 and 91 freeways in Southern California, we cover surrounding communities throughout the area. Begin with a no-cost consultation and quote. Backed by more than ten years of expertise and a satisfaction guarantee, we keep your RV prepared for travel. Trust us to manage your roof issues with assurance! Connect with us through contact or see our remodel services.
Frequently Asked Questions About RV Roof Repair Near Me
How much does RV roof repair cost near me?
Costs vary by damage scope and method selected. Sealants and coatings generally range from eight hundred to three thousand five hundred dollars, covering preparation, materials, labor, and testing. Full replacement averages four thousand to twelve thousand dollars, including size, substrate work, and membrane type. Early intervention keeps expenses lower. See our RV roof repair page for details.
Is RV roof coating better than replacement?
Coating suits surface-level wear or minor leaks, offering fast application and lower cost while protecting the existing structure. Replacement excels for deep damage like rot, providing a rebuilt roof with longer life. The best choice matches inspection findings. Learn more on our RV maintenance section.
When should I replace my RV roof instead of sealing?
Replace when inspection shows extensive rot, delamination, or repeated sealant failures. Surface treatments only delay problems in these cases. Professional evaluation confirms the need. Check our RV collision repair page for related structural work.
What are the main causes of RV roof leaks?
Leaks usually stem from failed sealant around vents, seams, and fixtures due to weathering and expansion. Debris traps moisture, and impacts create punctures. Regular checks prevent escalation. Explore prevention on our RV service page.
How long does RV roof sealant last?
Quality sealants last five to ten years with proper care. Sun and travel accelerate wear. Annual inspections extend life. See our RV fiberglass repair services for material insights.
Can mobile RV roof repair handle full replacements?
Mobile services manage sealants and many repairs on-site. Full replacements are possible with proper equipment. Shop facilities suit complex cases. Contact us via contact page.
What are the early signs of RV roof damage?
Signs include ceiling stains, musty odors, cracked caulk, or soft spots. Bubbling or discoloration appears early. Prompt attention prevents major issues. View examples in our photo gallery.
How do I prevent future RV roof problems?
Inspect twice yearly, clean seams, reapply sealant, and use protective coatings. Avoid unnecessary roof traffic. Professional maintenance adds protection. Learn more at our maintenance page.
Does RV roof repair qualify for insurance claims?
Sudden damage from storms or impacts often qualifies, but wear-related issues may not. Document thoroughly. Approved claims reduce costs. See our collision repair insurance tips.
What is the best material for RV roof replacement?
TPO offers heat resistance and light weight. PVC provides seamless durability. Fiberglass suits impact-prone designs. Expert advice ensures best fit. Explore options on our RV remodel page.
OCRV Center
Address: 23281 La Palma Ave Yorba Linda, CA 92887Phone: (714) 909-1444
Email: [email protected]
OCRV Center
Rv Roof Repair Fiberglass Santa Ana, CA
Best Rv Roof Repair Santa Ana, CA
Rv Roof Repair Santa Ana, CA
Rv Slide Out Roof Repair Santa Ana, CA
Rv Roof Leak Repair Near Me Santa Ana, CA
Rv Trailer Roof Repair Santa Ana, CA
Rv Roof Replacement Santa Ana, CA
Rv Roof Repair Santa Ana, CA
Rv Trailer Rubber Roof Repair Santa Ana, CA
Rv Roof Leak Repair Near Me Santa Ana, CA
Rv Rubber Roof Maintenance Santa Ana, CA
Rv Slide Out Roof Repair Santa Ana, CA
Rubber Roofing For Rv Santa Ana, CA
Rv Roof Repair Near Me Santa Ana, CA
Rv Rubber Roof Replacement Santa Ana, CA
Rv Rubber Roof Repair Santa Ana, CA
Class C Rv Roof Repair Santa Ana, CA
Rv Fiberglass Roof Repair Santa Ana, CA
Class C Rv Roof Repair Santa Ana, CA
Motorhome Roof Replacement Santa Ana, CA
Rv Fiberglass Roof Repair Santa Ana, CA
Replace Rv Roof Santa Ana, CA
Rv Trailer Rubber Roof Repair Santa Ana, CA
Rv Roof Repair Near Me Santa Ana, CA
Epdm Rv Roof Repair Santa Ana, CA
Rv Rubber Roof Replacement Cost Santa Ana, CA
Rv Roof Repair Santa Ana, CA
Rv Fiberglass Roof Repair Santa Ana, CA
Rv Roof Maintenance Santa Ana, CA
Rv Roof Repair Santa Ana, CA
Rv Roof Leak Repair Near Me Santa Ana, CA
Rv Roof Leak Repair Near Me Santa Ana, CA
Rv Slide Out Roof Repair Santa Ana, CA
Motorhome Roof Replacement Santa Ana, CA
Rv Slide Out Roof Repair Santa Ana, CA
Rv Fiberglass Roof Repair Santa Ana, CA
Rv Roof Repair Service Near Me Santa Ana, CA
Rv Roof Repair Fiberglass Santa Ana, CA
Rv Roof Repair Near Me Santa Ana, CA
Rv Roof Replacement Santa Ana, CA
Rubber Roof Installation Santa Ana, CA
Rv Roof Repair Near Me Santa Ana, CA
Rv Roof Leak Repair Santa Ana, CA
Motorhome Roof Replacement Santa Ana, CA
Rubber Roofing For Campers Santa Ana, CA
Rv Slide Out Roof Repair Santa Ana, CA
Rv Rubber Roof Replacement Santa Ana, CA
Rv Roof Repair Fiberglass Santa Ana, CA
Rv Roof Repair Service Near Me Santa Ana, CA
Repair Rv Roof Santa Ana, CA
Rubber Roof For Camper Santa Ana, CA
Rubber Roof For Camper Santa Ana, CA
Rv Slide Out Roof Repair Santa Ana, CA
Rv Roof Repair Fiberglass Santa Ana, CA
Rv Roof Repair Fiberglass Santa Ana, CA
Rv Roof Repair Santa Ana, CA
Motorhome Roof Replacement Santa Ana, CA
Rv Roof Repair Service Near Me Santa Ana, CA
Rv Rubber Roof Repair Santa Ana, CA
Rubber Roofing For Rv Santa Ana, CA
Replace Rv Roof Santa Ana, CA
Rv Roof Leak Repair Santa Ana, CA
Rv Roof Repair Santa Ana, CA
Rv Roof Repair Near Me Santa Ana, CA
Rv Rubber Roof Maintenance Santa Ana, CA
Rubber Roofing For Campers Santa Ana, CA
Rv Roof Repair Santa Ana, CA
Rubber Roof For Camper Santa Ana, CA
Rubber Roofing For Campers Santa Ana, CA
Rv Slide Out Roof Repair Santa Ana, CA
Repair Rv Roof Leak Santa Ana, CA
Motorhome Roof Replacement Santa Ana, CA
Rv Roof Repair Fiberglass Santa Ana, CA
Rv Rubber Roof Maintenance Santa Ana, CA
Replace Rv Roof Santa Ana, CA
Class C Rv Roof Repair Santa Ana, CA
Rubber Roof Installation Santa Ana, CA
Resealing Rv Roof Santa Ana, CA
Affordable Seo Near Me Santa Ana, CA
Find A Seo Company Near Me Santa Ana, CA
OCRV Center
Rubber Roofing For Rv Santa Ana, CA
Rubber Roofing For Campers Santa Ana, CA
Table of Contents
- – OCRV Center
- – Understanding Your RV Roof Repair Options Near Me
- – Breaking Down Sealants and Coatings for RV Roofs
- – When Full RV Roof Replacement Makes Sense
- – Direct Cost Comparison: Sealants vs Full Repla...
- – Pros, Cons, and Decision Framework
- – Preventing Future RV Roof Problems
- – Real Owner Experiences and Outcomes
- – Why Choose a One-Stop Shop for RV Roof Repair ...
- – We Can Help! Contact Us Today
- – Frequently Asked Questions About RV Roof Repai...
- – OCRV Center
Latest Posts
Pomona Rv Trailer Repair Shops Near Me
Silverado Rv Carpet Replacement
Atwood Rv Collision Repair Near Me
More
Latest Posts
Pomona Rv Trailer Repair Shops Near Me
Silverado Rv Carpet Replacement
Atwood Rv Collision Repair Near Me