All Categories
Featured
Table of Contents
- – Rv Fiberglass Roof Repair Montclair, CA
- – OCRV Center
- – Replace Rv Roof Montclair, CA
- – Rv Roof Repair Fiberglass Montclair, CA
- – Rv Roof Leak Repair Montclair, CA
- – Rubber Roofing For Rv Montclair, CA
- – Rubber Roof For Camper Montclair, CA
- – Resealing Rv Roof Montclair, CA
- – Rv Rubber Roof Repair Montclair, CA
- – Rv Rubber Roof Repair Montclair, CA
- – OCRV Center
Rv Fiberglass Roof Repair Montclair, CA
In this post, we desire to share with you how to DIY Motor home roof repair. Knowing exactly how to DIY a great deal of the things that can break or mess up will conserve you not just a great deal of money on Motor home repair work but might likewise conserve you a lot of prospective time in the shop!
I might obtain a small payment when you make an acquisition using my link. This is how we finished up with a few little splits on the roof of our Recreational vehicle.
Replace Rv Roof Montclair, CA
We believed we were clear of the branches, but we ended up catching a few of them on the far left side of the roofing. There were an overall of 4-5 tiny openings in the side of the roof covering. We didn't check the roof covering since we didn't believe we strike anything.
During the tornado, we discovered that we had a tiny amount of water leaking via among the lights in the washroom. Thankfully we did not wind up with any long-term water damages. After the tornado, Tucker rose on the roof covering and that is when he discovered the openings.
Rv Roof Repair Fiberglass Montclair, CA
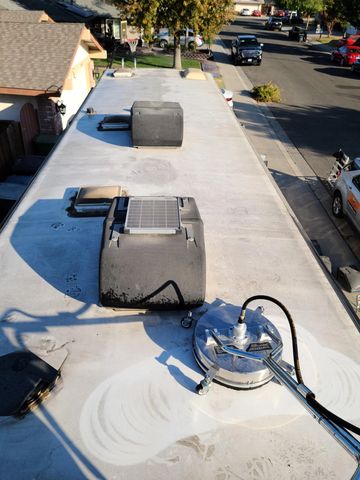
You'll want to clean up the area around the tear that you will be covering well. This allows the spot to properly adhere and will certainly protect against future leaks. If the damaged area has old Dicor, you have to eliminate as long as feasible. To clean up the roof, use scrubing alcohol and either a rag or paper towels.
, which is a RV roof fixing tape. Eternabond makes the best Motor home roof tapes and is a fantastic product to have on hand for the emergency repair service of a leaky roofing.
Rv Roof Leak Repair Montclair, CA
Eliminate the support and use carefully over the tear in the roofing. Once it has touched the roof it adheres quite promptly so you'll wish to make certain and position it right the very first time. Beginning with one side and smooth it out. Press firmly and continue to scrub it and ravel the patch for a number of mins.
This rubber sealer produces a safe second seal on your rubber roofing and guarantees that the leakage is effectively secured. This is most likely the same sealer that was used on your recreational vehicle roof to secure around the roofing vents, a/c unit, etc. There are a great deal of Dicor RV roofing system repair items that you can get including roofing system coverings, roofing system sealant, and more for the surface area of your roofing.
If the damage gets on the edge of your camper roofing system like ours was, you may have some Dicor that diminishes the side. Wipe any type of excess off and do not permit it to diminish also much. This is a self-leveling sealant so you should wind up with a fairly level spot.
Rubber Roofing For Rv Montclair, CA
Over time, it will entirely harden and you will not have to worry about it any longer. After the Dicor lap sealer was used If the leakage in your motor home roofing is a tiny location, the most effective means to repair it is to follow our detailed overview and repair the damaged area on your own to take care of the small leakage
A simple recreational vehicle roofing repair service, as we did on our fixing work, is fairly affordable and need to cost much less than $50 for do it yourself motor home proprietors. To change a whole RV roofing with substantial damages would lead to a lot more pricey repairs. I hope that you have actually located the info in this article helpful.
Rubber Roof For Camper Montclair, CA
This will certainly offer you assurance and verify that your roof covering remains in excellent form. Exactly how to Do It Yourself Your Motor Home Roofing System Repair Work.
If you don't examine, reseal, and repair your recreational vehicle roof covering routinely, you will end up with some beautiful awful water damage. This is something that will rapidly lower the value of your RV and could also render it unusable. Taking care of your Motor home roof covering is something you can possibly do all on your own.
After concerning 10 years, it will certainly likewise be needed to reseal the entire roofing system. To do this, you'll need to climb onto the roofing, yet be really mindful when you do. Are you certain it's strong enough to sustain you? Exists a ladder at the back? If not, it most likely isn't solid enough to be walked on.
Next, you'll intend to cleanse your roof extensively, so regarding get rid of any dust fragments. You can use a long managed brush for this, but never use a cleaner that consists of petroleum solvents or citrus components on your rubber or plastic roof covering. These kinds of cleaners will trigger long-term damages to the surface area.
Resealing Rv Roof Montclair, CA
While you're cleaning up, scuff off any debris or old roof material, but beware while you do this as you can easily extend a tear, or also punch an opening with the roofing. You should then dry out the roof covering as best as you can. Note: Rubber recreational vehicle roofs can be very unsafe when wet.
After the roof is clean, you are mosting likely to intend to inspect the seams for holes, splits or peeling, so you can reseal wherever needed. In addition to that, you'll wish to challenge resealing all seams once a year whether or not they reveal signs of wear.
Rv Rubber Roof Repair Montclair, CA
When it comes to choosing the best Motor home roofing system sealant, you'll want to think about whether you are fixing a tear, resealing a joint, or securing the whole roof covering. It can be utilized for spot securing or to reseal every seam on the Motor home roof covering. Simply cleanse the area well and use with a caulk gun.
Rv Rubber Roof Repair Montclair, CA
Similar to the EPDM system provided above, this covering product will cover your TPO roof covering and help it last another 10 years. Prior To EPDM and TPO, steel was the product of selection for RV roofing systems.
The previously mentioned EternaBond is still king when it comes to fixing little damages on a metal roof. Recreational vehicle steel roofing systems do need to be completely resealed from time to time.
Rv Roof Leak Repair Near Me Montclair, CARv Rubber Roof Maintenance Montclair, CA
Repair Rv Roof Montclair, CA
Rv Trailer Roof Repair Montclair, CA
Class C Rv Roof Repair Montclair, CA
Motorhome Roof Replacement Montclair, CA
Replace Rv Roof Montclair, CA
Rubber Roofing For Campers Montclair, CA
Motorhome Roof Replacement Montclair, CA
Repair Rv Roof Leak Montclair, CA
Best Rv Roof Repair Montclair, CA
Replace Rv Roof Montclair, CA
Class C Rv Roof Repair Montclair, CA
Rv Roof Repair Near Me Montclair, CA
Repair Rv Roof Montclair, CA
Rv Roof Repair Montclair, CA
Class C Rv Roof Repair Montclair, CA
Rv Roof Replacement Montclair, CA
Epdm Rv Roof Repair Montclair, CA
Resealing Rv Roof Montclair, CA
Rv Roof Leak Repair Montclair, CA
Repair Rv Roof Leak Montclair, CA
Class C Rv Roof Repair Montclair, CA
Rv Roof Leak Repair Near Me Montclair, CA
Rv Roof Replacement Montclair, CA
Rv Rubber Roof Maintenance Montclair, CA
Resealing Rv Roof Montclair, CA
Class C Rv Roof Repair Montclair, CA
Rubber Roofing For Campers Montclair, CA
Rubber Roof Installation Montclair, CA
Roof Repair For Rv Montclair, CA
Epdm Rv Roof Repair Montclair, CA
Rv Trailer Rubber Roof Repair Montclair, CA
Motorhome Roof Replacement Montclair, CA
Rubber Roofing For Campers Montclair, CA
Rv Roof Repair Fiberglass Montclair, CA
Rubber Roofing For Campers Montclair, CA
Rv Roof Repair Montclair, CA
Rv Slide Out Roof Repair Montclair, CA
Rv Roof Replacement Montclair, CA
Motorhome Roof Replacement Montclair, CA
Rv Roof Repair Fiberglass Montclair, CA
Motorhome Roof Replacement Montclair, CA
Replace Rv Roof Montclair, CA
Roof Repair For Rv Montclair, CA
Rv Fiberglass Roof Repair Montclair, CA
Rv Trailer Roof Repair Montclair, CA
Rv Roof Maintenance Montclair, CA
Epdm Rv Roof Repair Montclair, CA
Best Rv Roof Repair Montclair, CA
Motorhome Roof Replacement Montclair, CA
Rubber Roof For Rv Montclair, CA
Rubber Roof For Rv Montclair, CA
Repair Rv Roof Leak Montclair, CA
Rv Roof Leak Repair Near Me Montclair, CA
Rubber Roofing For Rv Montclair, CA
Rv Roof Leak Repair Near Me Montclair, CA
Repair Rv Roof Montclair, CA
Rv Trailer Roof Repair Montclair, CA
Rv Slide Out Roof Repair Montclair, CA
Rv Trailer Roof Repair Montclair, CA
Rv Trailer Roof Repair Montclair, CA
Rv Trailer Roof Repair Montclair, CA
Rv Roof Leak Repair Montclair, CA
Best Rv Roof Repair Montclair, CA
Rv Trailer Roof Repair Montclair, CA
Rv Roof Replacement Montclair, CA
Repair Rv Roof Leak Montclair, CA
Rv Roof Repair Fiberglass Montclair, CA
Rv Fiberglass Roof Repair Montclair, CA
Rv Roof Repair Near Me Montclair, CA
Class C Rv Roof Repair Montclair, CA
Rv Roof Repair Fiberglass Montclair, CA
Rv Rubber Roof Maintenance Montclair, CA
Rv Fiberglass Roof Repair Montclair, CA
Rv Rubber Roof Repair Montclair, CA
Rubber Roof For Rv Montclair, CA
Rv Trailer Roof Repair Montclair, CA
Find Seo Optimization Services Montclair, CA
Best Seo Marketing Company Montclair, CA
OCRV Center
Table of Contents
- – Rv Fiberglass Roof Repair Montclair, CA
- – OCRV Center
- – Replace Rv Roof Montclair, CA
- – Rv Roof Repair Fiberglass Montclair, CA
- – Rv Roof Leak Repair Montclair, CA
- – Rubber Roofing For Rv Montclair, CA
- – Rubber Roof For Camper Montclair, CA
- – Resealing Rv Roof Montclair, CA
- – Rv Rubber Roof Repair Montclair, CA
- – Rv Rubber Roof Repair Montclair, CA
- – OCRV Center
Latest Posts
Employee Benefits Company Laguna Hills
Commercial Swamp Cooler Repair Altadena
Evaporative Cooling Repair Near Me Los Angeles County
More
Latest Posts
Employee Benefits Company Laguna Hills
Commercial Swamp Cooler Repair Altadena
Evaporative Cooling Repair Near Me Los Angeles County